ringr, a sound event detection system

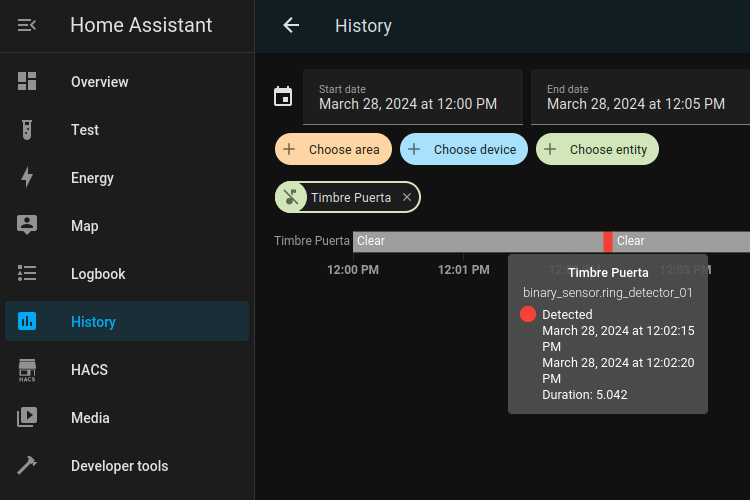
Some months ago I decided to develop a small project for fun to solve a need I have at home: detect intercom and doorbell notification sounds and transform them into “smart” alarms. I named it ringr.
Requirements
I decided to keep things simple this time, as well as give a new life to old hardware that I had collecting dust in a drawer, so I imposed some restrictions on myself:
- It had to run on an old Raspberry Pi 1 that hasn’t been used for years.
- It had to run with a very cheap and low quality USB microphone.
- It had to be able to detect the intercom and doorbell notification sounds without false positives warnings.
- It had to notify states to my personal Home Assistant installation and provide support to add more notification backends in the future.
If I didn’t already have the hardware and had to start from scratch, I would have probably used an ESP32 with a MEMS microphone and the arduinoFFT library. But since I had a Raspberry and a rather poor-quality mini USB microphone, I decided to give them a chance.
Fast Fourier Transform (FFT)
The Fast Fourier Transform algorithm allows us to decompose a signal (in this case, an audio signal) from the time domain to the frequency domain.
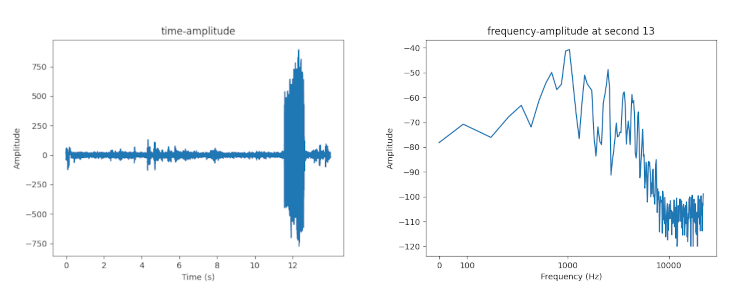
When we capture a sound signal over a period of time we obtain a time-amplitude representation. Thanks to the FFT algorithm we can transform it into another one that allows us to know the frequencies that created the signal and their amplitudes: a frequency-amplitude representation.
In the following image we can observe on the left the time-amplitude representation of a sound signal and on the right the frequency-amplitude representation after applying the FFT algorithm:

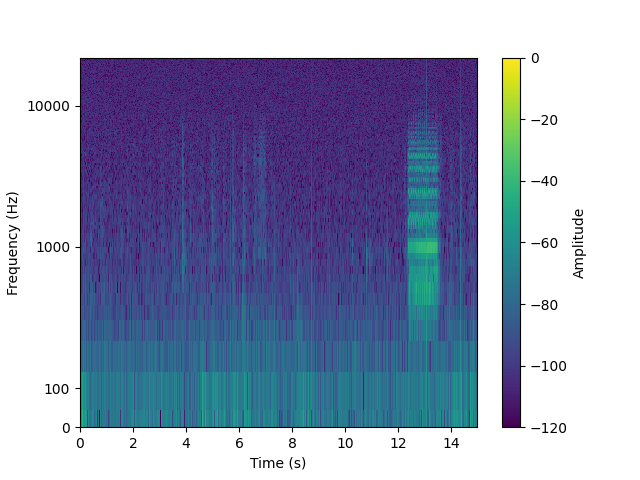
Or visualizing it as a spectrogram we can see the three magnitudes at the same time:

The intricacies of how this algorithm works are beyond the scope of this post, and thanks to the powerful math libs available in almost any programming language today we don’t need to understand the algorithm internally to use it. However, it’s important to know its key parameters to fine-tune the solution and be able to adapt it to your specific needs.
The main parameter is the sample rate or sampling frequency. It is measured in Hz and defines the number of samples per second that are taken from a signal, e.g. 48kHz. The higher the sampling frequency, the higher the frequencies we can detect. It is determined by the microphone / audio interface used.
According to Nyquist’s theory, the highest frequency the FFT algorithm can accurately detect is calculated as half of the sample rate. This means we need a sample rate of at least 48kHz to get frequencies up to 24kHz, which is within the range of what humans can hear, typically from 20Hz to 20kHz.
The block size is the number of samples we will analyze in each iteration.
For simplicity, I have chosen to deduce the block size from another parameter, the block duration, which determines how much time is analyzed in each iteration. We can express the block duration as: block_size = sample_rate * block_duration.
An important characteristic of sound signals is that they are rarely composed of a single frequency. In most cases, several frequencies are involved. The sound of a voice, an instrument, or the ambient noise is composed of different simultaneous frequencies with different levels of energy, with the dominant frequency carrying the most energy. It is important to know the dominant frequency of the sound we want to detect so that other secondary frequencies and overtones do not create false positives.
The FFT algorithm takes a set of samples of a fixed size and return a set of values of the same size. We call these values frequency bins and each one represents the amplitude of a frequency range.
For example, if we choose a sample rate of 48kHz and decide to divide the audible spectrum into 256 frequency bins, we need twice as many samples (512) because according to Nyquist’s theory, only half of the bins will contain valid values.
In this scenario, each frequency bin represents a range of frequencies of 93.75Hz, a value we will call resolution. This implies that it is impossible to distinguish between frequencies like 100Hz and 150Hz because their difference is smaller than the resolution. As a result, the first bin represents the frequency range between 0 and 93.75Hz, the second between 93.75 and 187.5Hz, and so on, successively.
PortAudio API
Starting to work with audio on Linux is like trying to walk through a maze. There are dozens of acronyms, APIs, and layers upon layers, each trying to unify and solve the problems of its predecessors: ALSA, OSS, Jack, PulseAudio, PipeWire, etc.
PortAudio is one of my favorite choices when it comes to prototyping something related to sound, as it is simple enough to get something working with a just a few lines of code and abstracts away all the underlying layers, providing a cross-platform API that allows for capturing and playing audio on many platforms, including Windows, MacOS and Linux.
Furthermore, there is a good binding of the library for Python: the sounddevice library, which allows interaction with PortAudio and includes a set of interesting features such as automatic detection of compatible audio interfaces and their characteristics: sample rate, low and high latencies, etc. So that it was my go-to solution for this prototype.
ringr
After some testing and fine-adjustments, I saw that my idea made sense and that I was getting good results, so I decided to package everything into a simple application that could run in the background as a systemd service or as a Docker container, making the configuration and deployment process straightforward.
You only need to know and configure the following:
- The audio device to use.
- The dominant frequency of the sound event. You can use any free audio spectrum analyzer on your smartphone to detect it.
- The estimate duration of the event.
- The amplitude threshold of the dominant frequency to be detected as an event.
Adjusting the amplitude threshold requires some trial and error as it depends on the resolution and quality of the microphone, the distance from the sound source, the amount of ambient noise or other sounds in the same frequency range, etc. You can start with a high value near 100% and decrease it until all events of interest are captured.
You also have to configure the notification backend to use. By default, I have implemented two:
- Notify to a telegram bot.
- Notify to Home Assistant via MQTT as an auto-discoverable MQTT device.
Optionally you can configure some advanced parameters to fine-tune the event detection:
- The number of frequency bins in which divide the range of audible frequencies. By default it uses 256.
- The block duration. By default it capture audio in blocks of 50ms.
- The acceptance ratio, i.e., the number of blocks that must be above the amplitude threshold in the desired frequency range during the event duration.
- A cooldown time after detect an event, so that any sample during this period will be discarded and will not be analyzed.
- A gain boost in case your sound device capture very low signals.
- The input latency of capture.
The final code is quite simple. One thread keeps recording audio samples in batches of size equal to block size (and block duration as explained above). Another performs the FFT, get the amplitude of the signal in the desired frequency bin and checks if it is above the given threshold.
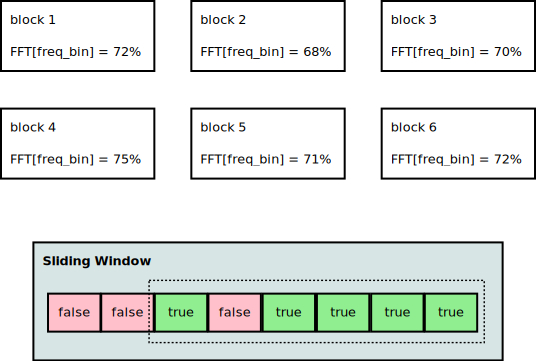
These results (true or false) are stored in a sliding window. If the frequency’s amplitude we are interested in stays above the threshold for a certain period of time, the application interprets that a sound event has occurred and proceeds to notify the new state.
Let’s see it with an example:
sample rate: 48kHzblock duration: 50ms ->block size: 2400 samplespeak duration: 300ms ->peak size: 14400 samples = 6 blocksthreshold: 70%frequency bin: 12 (1223.52Hz to 1317.64Hz)
Because sound signals don’t have the same energy at every moment, we will use an 80% acceptance ratio. This means that if the desired frequency is above the threshold in 5 out of the 6 consecutive blocks we analyze, we’ll consider that a sound event has occurred.

Conclusions
My needs were simple: to detect intercom and doorbell notifications without false positives caused, for example, by the noise from closing the door or walking around, or by a dog barking. After more than 4 months of continuous operation, I can say that the solution meets my requirements and I couldn’t be happier with the results.
However, this solution has many other applications that may be of interest to other people (or to myself in the future) for automating your smart home or assisting disabled people. Some of these applications may include:
- Smoke alarm sound detection
- Detection of the end-of-program audible warning of some appliances such as washing machines, clothes dryers or dishwashers
- Baby crying detection
- Dog bark detection
The source code of ringr is available on GitHub, as well as the documentation, and it is licensed under a GNU GPL v3 license.